


Last Update on December 30, 2025
Using a keyboard and mouse in virtual reality has evolved significantly with the Virtual Desktop updates in late 2025. As we enter 2026, these peripherals have become essential for transforming your Meta Quest 3 or Quest 3S into a truly productive workstation or a wireless gaming setup. Whether you want to manage complex projects, code, play non-VR titles, or simply browse comfortably, this guide shows you exactly how to connect and optimize your keyboard and mouse in Virtual Desktop. No more guesswork: here are the proven methods for a smooth, lag-free experience in 2026.
Why use a keyboard and mouse on Virtual Desktop in 2026?
In 2026, Virtual Desktop has established itself as the leading solution for productivity in virtual reality. The latest updates from late 2025 have considerably improved peripheral management, notably with the ‘Use Touch Input as Mouse’ option and native support for Reality Mixer mode, which allows you to see your physical keyboard directly within the VR environment.
The benefits are manifold: surgical precision for typing, fluid navigation in complex interfaces, full compatibility with professional software and PC games, and above all, a significant reduction in latency compared to 2024 solutions. With the AV1 codec optimized for 2026, the clarity of displayed text is now comparable to a physical 4K monitor, making long work sessions perfectly comfortable.
The democratization of Wi-Fi 6E and the upcoming arrival of Wi-Fi 7 also enable ultra-stable wireless connections, virtually eliminating any perceptible latency between your actions and their display in VR.
What you need before starting
Before configuring your peripherals, ensure you have the appropriate hardware and network infrastructure. The quality of your experience depends directly on these fundamental prerequisites.
A compatible VR headset (2025-2026 generation)
The following headsets are fully compatible with Virtual Desktop in 2026:
- Meta Quest 3 / Quest 3S / Quest 4 (announced for mid-2026)
- Pico 4 / Pico 5 (improved support in 2026)
- Meta Quest Pro (still performing well for productivity)
- Apple Vision Pro (via compatible third-party application)
- HTC Vive XR Elite
The Meta Quest 3S, released in late 2025, represents excellent value for money for getting started with a keyboard and mouse in VR, thanks to its high-resolution color Passthrough mode.
A PC capable of handling streaming in 2026
Hardware requirements have slightly increased with the improvement in streaming quality:
- Processor: Intel Core i5-12400 / AMD Ryzen 5 5600X minimum (2021+ generation)
- Graphics Card: RTX 3060 / AMD RX 6600 XT minimum (RTX 4060+ or RX 7600+ recommended for AV1)
- RAM: 16 GB minimum, 32 GB ideal for multitasking
- Storage: NVMe Gen 3 SSD or higher mandatory
- Operating System: Windows 11 (version 22H2 or higher for optimal AV1 support)
A latest-generation Wi-Fi network
This is the critical element that makes all the difference in 2026. Virtual Desktop fully exploits the new wireless standards:
- Use a Wi-Fi 6E (6GHz) or Wi-Fi 7 router for minimal latency
- Connect your PC via 2.5 Gbps or 10 Gbps Ethernet if possible
- Place the router in the same room as your VR area
- Disable QoS and automatic channel management that can interfere
- Configure a dedicated SSID for your VR headset on the 6GHz band
For optimal performance, consult our guide on how to set up VR on PC, which details complete network optimization.
Installing Virtual Desktop (2026 version)
The 2026 version of Virtual Desktop has simplified the installation process while adding new features for peripherals. Here is the updated procedure.
Step 1: Install Virtual Desktop on the headset
The Virtual Desktop app must be purchased once from your headset’s store. It costs approximately $19.99 and offers free lifetime updates.
- Put on your headset and log in to your Meta or Pico account
- Open the Meta Quest Store or Pico Store
- Search for Virtual Desktop (developer: Guy Godin)
- Purchase and install the application
- Launch it for the first time to initialize permissions
Step 2: Download Virtual Desktop Streamer (2026 build)
The companion PC application was significantly improved in 2025-2026 with new configuration options for peripherals.
- Visit the official website: vrdesktop.net
- Download the latest version of the Virtual Desktop Streamer (v1.30+ for 2026)
- Install the software with administrator rights
- Upon first launch, enter your Oculus/Meta username (case-sensitive)
- Accept Windows firewall permissions to allow network communication
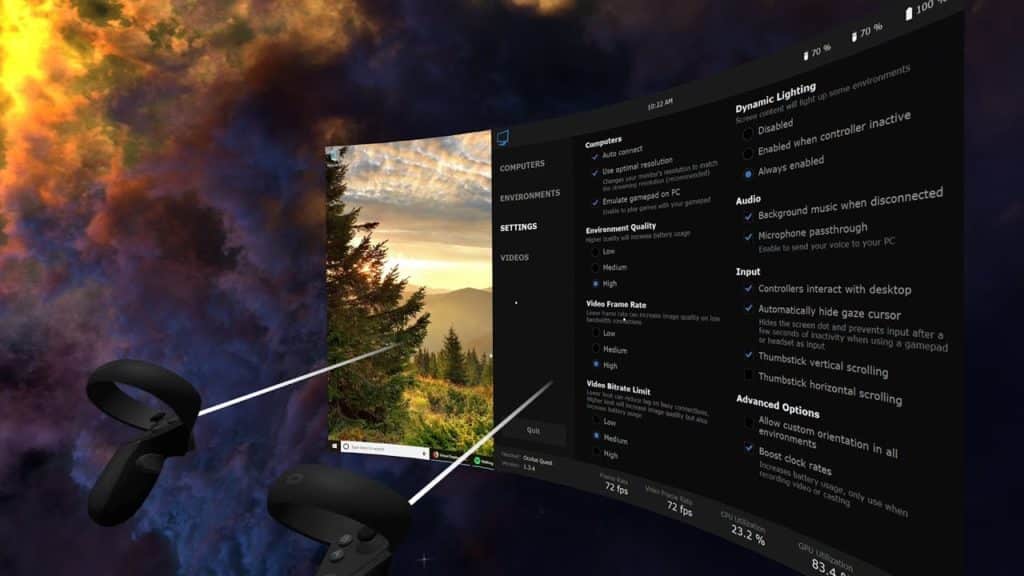
Step 3: Optimal Streamer configuration for office work
New 2026 settings allow for specific optimization for keyboard-mouse use:
- Open the Settings of the Virtual Desktop Streamer
- In the Streaming tab, select the AV1 codec if your GPU supports it (RTX 4000+ or RX 7000+)
- Set the Bitrate to 150-200 Mbps for maximum text clarity
- Enable ‘Reduce Input Latency’ for peripherals
- In the Input tab, check ‘Forward keyboard and mouse to headset’
Step 4: Initial headset-PC connection
- Ensure the Virtual Desktop Streamer is running on your PC (icon visible in the system tray)
- In the headset, launch the Virtual Desktop app
- Your PC should automatically appear in the list
- Select your computer and wait for the connection (3-5 seconds)
- Your Windows desktop will be displayed in a customizable VR environment
Method 1: Connecting peripherals to the PC (minimum latency)

This is the recommended method for 2026 and the one used by 90% of VR professionals. It offers the lowest latency and the widest compatibility with all software.
USB cable configuration (latency < 1ms)
A wired connection remains the absolute benchmark for responsiveness:
- Connect your keyboard to the PC via USB (preferably USB 3.0 or USB-C)
- Connect your mouse to the PC via USB (prioritize USB 3.0 ports for high-frequency gaming mice)
- Drivers install automatically under Windows 11
- Launch Virtual Desktop on your headset
- Your peripherals are immediately functional in the virtual environment
Advantages of this method:
- Imperceptible latency (< 1 millisecond)
- No wireless interference
- Full compatibility with keyboard macros and programmable mouse buttons
- Support for high polling rates (1000Hz and more)
- Works with all software: games, IDEs, Adobe suites, etc.
Bluetooth configuration to PC (latency ~5-10ms)
If you prefer wireless while maintaining maximum compatibility:
- Enable Bluetooth on your PC (Windows Settings > Bluetooth & devices)
- Put your keyboard/mouse into pairing mode
- Click ‘Add device’ in Windows
- Select your peripherals from the list
- Wait for connection confirmation
Optimization to reduce Bluetooth latency:
- Use a high-quality Bluetooth 5.2 or 5.3 dongle (avoid Bluetooth integrated into motherboards)
- Place the USB dongle on an extension cable to bring it closer to your VR area
- Disable other unused Bluetooth devices that saturate the 2.4GHz spectrum
- Prioritize keyboards and mice with proprietary low-latency protocols (Logitech Lightspeed, Razer HyperSpeed, etc.)
Why this method is superior for productivity
By connecting your peripherals to the PC rather than the headset, you benefit from:
- All your custom keyboard shortcuts
- Native detection in all software (Steam, Epic, Adobe CC, Visual Studio, etc.)
- Adjustable DPI on your gaming mouse
- Synchronized RGB lighting profiles
- Virtual multi-monitor support with fluid navigation
If you use Virtual Desktop to play Steam VR games, this method is also recommended. Discover how to use Steam VR to optimize your gaming setup.
Method 2: Connecting to the VR headset (Input Forwarding)
This alternative method allows you to use a keyboard and mouse even without the PC turned on, directly with the headset’s native applications. It was greatly improved in 2025 with the ‘Input Forwarding’ system, which intelligently redirects inputs to Virtual Desktop when it is active.
Bluetooth pairing with the Quest (2026 update)
The pairing process has been simplified with the latest Quest firmware updates:
- Put on your headset and press the Meta button on the right controller
- Open the Quick Settings menu (icon in the top right)
- Select All Settings
- Go to Devices > Keyboard and Mouse (new 2025 menu)
- Enable Bluetooth if necessary
- Click ‘Pair new device’
- Put your keyboard into pairing mode (usually Fn + Bluetooth key)
- Repeat for the mouse
Compatible keyboards and mice in 2026
The compatibility list has expanded considerably. Here are the tested and validated models:
Recommended keyboards:
- Logitech K830 (with integrated tracking on Quest 3/3S)
- Apple Magic Keyboard (excellent Mac and PC compatibility)
- Keychron K3 / K8 (compact mechanical keyboard)
- Microsoft Surface Keyboard
- Any standard Bluetooth keyboard (HID compatible)
Recommended mice:
- Logitech MX Master 3S (multi-device)
- Razer Orochi V2 (ultra-responsive Bluetooth mode)
- Microsoft Arc Mouse
- Apple Magic Mouse 2
Input Forwarding mode configuration
Once your peripherals are paired with the headset, enable redirection to Virtual Desktop:
- In Virtual Desktop (on the headset), open the Settings menu (gear icon)
- Go to Input > Keyboard & Mouse
- Enable ‘Forward Bluetooth Input to PC’
- Select your peripherals from the list
- Test with a text editor to confirm the link
Your peripherals will now work in both the native Quest interface AND in Virtual Desktop when connected to the PC.
Limitations to know (2026 updates)
Despite improvements, some constraints remain:
- Slightly higher latency (10-15ms vs < 5ms with direct PC connection)
- Some Windows system shortcuts may not work
- Complex macros or third-party software (AutoHotkey) are not supported
- The headset battery drains faster with Bluetooth active
Activating Passthrough to see your keyboard in Mixed Reality
One of the major innovations of late 2025 is the Reality Mixer mode, which combines the virtual environment with a view of your physical keyboard. This feature radically transforms the typing experience in VR.
Keyboard tracking configuration (Quest 3/3S/Pro)
Keyboard tracking uses Passthrough cameras to visually anchor your keyboard in VR space:
- Ensure you are using a compatible keyboard (official list on the Meta site)
- In Quest settings, go to Movement > Keyboard
- Select ‘Enable keyboard tracking’
- Place your keyboard in the field of view and follow the calibration procedure
- The system will automatically detect your keyboard in future sessions
Keyboards with native tracking (2026):
- Logitech K830 (the most precise)
- Apple Magic Keyboard
- Logitech MX Keys / MX Keys Mini
- Any keyboard with distinctive visual markers
Partial Passthrough mode in Virtual Desktop
Virtual Desktop now integrates a hybrid mode that selectively displays your keyboard area:
- Launch Virtual Desktop and connect to your PC
- Open the quick menu (left controller button)
- Select Environment > Mixed Reality
- Enable ‘Show Keyboard Area’
- Adjust the size and position of the Passthrough area with the controllers
You will now see your physical keyboard transparently beneath your virtual screen, which virtually eliminates any learning curve.
Lighting optimization for Passthrough
Passthrough quality depends heavily on lighting conditions:
- Use indirect lighting (desk lamp pointed at the wall)
- Avoid direct sunlight which creates glare
- Adjust Passthrough brightness in Quest settings (70-80% recommended)
- Use a keyboard with backlighting to improve visibility
To discover other applications of mixed reality, consult our complete guide exploring professional and creative uses of this technology.
Using keyboard and mouse in VR: practical applications
Now that everything is configured, let’s explore concrete use cases and specific optimizations for each scenario.
Productivity and office work
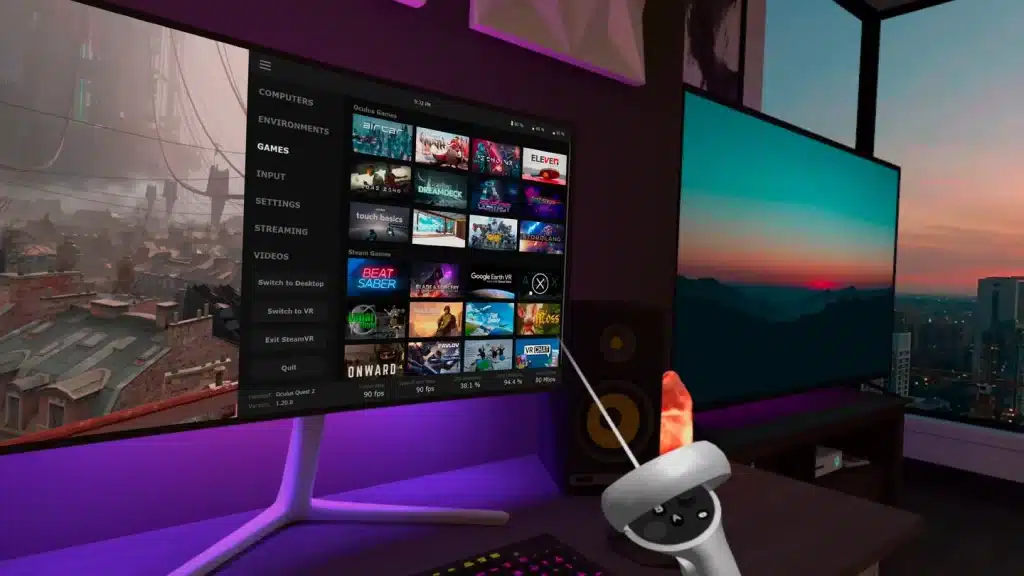
Virtual Desktop excels at transforming your Quest into a mobile workstation:
Virtual multi-monitor configuration:
- In Virtual Desktop, press the left controller button
- Select Monitors > Add Virtual Monitor
- Position up to 3 virtual screens in your workspace
- Use Alt+Tab normally to navigate between applications
- The mouse cursor moves across screens naturally
Essential keyboard shortcuts in Virtual Desktop:
- Ctrl + Alt + M: Show/hide the VR menu
- Ctrl + Alt + F: Toggle full-screen mode
- Ctrl + Alt + R: Recenter the view
- Ctrl + Alt + Arrow Keys: Adjust screen position
Tested and optimized applications:
- Microsoft 365 Suite (Word, Excel, PowerPoint)
- Adobe Creative Cloud (Photoshop, Premiere, After Effects)
- Development IDEs (Visual Studio Code, IntelliJ IDEA)
- Web browsers (Chrome, Firefox, Edge – all perfectly functional)
- CAD/3D software (Blender, AutoCAD, Fusion 360)
Gaming: classic PC games in VR
Many non-VR games play remarkably well with a keyboard and mouse in Virtual Desktop:
Strategy and management games:
- Civilization VI (turn-based, perfect in VR)
- StarCraft II (RTS with a large virtual screen)
- Cities: Skylines (immersive city-builder)
Discover our selection of the best simulation and city builder games compatible with this configuration.
MMORPGs and RPGs:
- World of Warcraft (perfectly readable interface)
- Final Fantasy XIV
- The Elder Scrolls Online
For fans of native VR MMORPGs, check out our top 5 VR MMORPGs.
Optimal gaming configuration:
- Set the bitrate to 200 Mbps for fast-paced games
- Enable ‘Gaming Mode’ in Virtual Desktop (reduces latency by 5-10ms)
- Disable V-Sync in games (use VD sync instead)
- Configure the virtual screen in curved mode for maximum immersion
Browsing and consuming content
Using a keyboard and mouse significantly improves the web experience in VR:
- Smooth scrolling with the mouse wheel
- Entering URLs and forms without frustrating virtual keyboards
- Copy-pasting between applications (Ctrl+C / Ctrl+V works)
- Multi-tab navigation with Ctrl+Tab
For video watching, combine Virtual Desktop with Bigscreen VR, which offers optimized cinema environments.
Troubleshooting: common problems and solutions (2026)
Even with an optimal configuration, some problems may occur. Here are solutions to the most frequent errors.
The keyboard or mouse is not responding
Symptom: No input is detected in Virtual Desktop despite the connection.
Solutions:
- Check that Virtual Desktop Streamer is running on the PC (icon in the system tray)
- In the Streamer, go to Settings > Input and verify that ‘Forward input to headset’ is enabled
- Disconnect and reconnect your USB peripherals
- Restart the Virtual Desktop Streamer (right-click the icon > Exit, then relaunch)
- If using Bluetooth peripherals, move closer to the dongle/PC
My mouse is invisible in Virtual Desktop
Symptom: The Windows cursor does not display, but clicks work.
Solutions:
- Press the left controller Menu button
- Go to Settings > Mouse
- Enable ‘Show Mouse Cursor’
- Increase the cursor size if necessary (recommended: 150-200%)
- Change the Windows cursor color (white on a light background = invisible)
Excessive keyboard latency (> 50ms)
Symptom: Perceptible delay between typing and the character appearing.
Diagnosis and solutions:
- Test your network latency: In VD, Menu > Statistics. Network latency should be < 20ms
- If network latency is high:
- Switch your PC to Ethernet (RJ45 cable)
- Move closer to the Wi-Fi router
- Change Wi-Fi channel (prefer 6GHz channels if using Wi-Fi 6E)
- Restart your router
- If network latency is OK:
- Temporarily reduce the bitrate to 100-120 Mbps
- Switch from H.265 to H.264 codec (less demanding)
- Close background PC applications (Chrome with 50 tabs, etc.)
- Update your GPU drivers (Nvidia/AMD)
For in-depth optimization of your PC VR setup, refer to our guide on optimizing a gaming laptop for VR.
AZERTY/QWERTY mapping issues
Symptom: Keys do not match (A gives Q, etc.).
Solutions:
- On your Windows PC, go to Settings > Time & Language > Language & Region
- Verify that your keyboard layout is correct (French AZERTY or US QWERTY)
- If you change the layout, restart Virtual Desktop Streamer
- In some cases, unplug/replug the keyboard after the change
The mouse wheel is not working
Solutions:
- In Windows, Settings > Devices > Mouse, verify that ‘Scroll inactive windows’ is enabled
- Test the wheel in a native Windows application (Notepad) to confirm it works outside VR
- Some mice require proprietary software (Logitech G Hub, Razer Synapse) to enable all functions
- Update your mouse firmware via the manufacturer’s software
Frequent Bluetooth disconnections
Symptom: The keyboard/mouse disconnects every 5-10 minutes.
Solutions:
- Replace the batteries/recharge the battery (most common cause)
- Move 2.4GHz Wi-Fi devices away that interfere (speakers, cameras, etc.)
- Use a dedicated Bluetooth 5.2+ USB dongle instead of integrated Bluetooth
- In Windows Device Manager > Bluetooth > Properties, uncheck ‘Allow the computer to turn off this device’
- Update Windows Bluetooth drivers via Windows Update
Advanced configuration: Mac, Linux, and specialized setups
Use on macOS (Apple Silicon M1/M2/M3)
Virtual Desktop has officially supported macOS since late 2024. The keyboard-mouse configuration is slightly different:
- Download Virtual Desktop Streamer for Mac (Universal version for Apple Silicon)
- Install and grant Accessibility and Screen Recording permissions
- Apple keyboards (Magic Keyboard) are automatically detected
- For mice, enable ‘Input Forwarding’ in the Streamer preferences
macOS Limitations:
- No AV1 codec (limited to H.265)
- Some system shortcuts (Cmd+Tab) are intercepted by macOS
- Slightly lower performance than equivalent Windows PCs
Keyboard-mouse setup for simulation (racing, flight)
For simulators, combine keyboard-mouse with other peripherals:
Racing setup:
- Wheel + pedals via USB on the PC
- Keyboard for menus and settings
- Mouse for navigating options (avoids letting go of the wheel)
Discover the best VR racing games compatible with this configuration.
Flight simulation setup:
- HOTAS (stick + throttle) via USB
- Keyboard for secondary commands (landing gear, lighting, etc.)
- Mouse for interacting with the virtual cockpit
If you are passionate about flight simulation, don’t miss X-Plane 12 VR and Flight Simulator VR.
Conclusion: mastering keyboard and mouse in VR for 2026
Using a keyboard and mouse in Virtual Desktop has reached impressive maturity by late 2025, and the foundations are solidly laid for massive adoption in 2026. With the right hardware and software configurations, your VR headset becomes a true alternative to traditional desktop setups, offering wireless flexibility without compromising productivity.
The two connection methods (peripherals to PC or headset) meet different needs: prioritize the PC connection for minimum latency and maximum compatibility, or opt for the headset connection if you seek the versatility and autonomy of the Quest. Passthrough mode with keyboard tracking removes the last barrier to adoption by allowing you to see your hands and physical keyboard.
In 2026, with the arrival of Wi-Fi 7 and next-generation headsets like the Quest 4, the experience will only get better. More efficient video codecs, increased screen resolutions, and continuous software optimizations from Virtual Desktop will continue to bridge the gap between VR and reality. For many, working or playing in a virtual office of infinite dimensions is becoming not only viable but preferable to a physical setup limited by space.
Whether you are a developer, creative, gamer, or simply curious about the possibilities of spatial productivity, mastering the use of the keyboard and mouse in VR is now an essential skill. Follow the steps in this guide, adjust to your specific needs, and you will discover that a VR headset can truly replace multiple physical screens while offering unparalleled flexibility.
Welcome to the era of borderless office work.


